Government of Ghana / Employee Pay ServicesStaying safe online

GOVERNMENT OF GHANA · EMPLOYEE PAY SERVICES

How to register for your GoG e-payslip

First-time account setup uses your employee number, Ghana Card and a phone number you can access. The CAGD video begins at “Forgot password?” on the sign-in screen.

By GoG ePay Services · Content updated

Log in to portal

What do I need before registering?

Have your employee number, complete Ghana Card number and access to your phone ready. A phone number is required; email is optional in the published registration instructions.

  1. Use your own employee and identity details.
  2. Ask HR to correct any locked employee fields that are wrong.
  3. Follow the current application if its screens have changed since the video.

What if my details do not match?

Check your employee number and Ghana Card carefully. If verification still fails, ask your employer’s HR or payroll administrator to check the record. Do not use another employee’s details.
Official sources

WE’LL TAKE IT ONE STEP AT A TIME

Let’s get you set up,
then find your payslip.

Brand new to the portal, or just need a refresher?
Choose the guide that fits.

PREFER TO WATCH?

Employee PayServices Registration

This 2-minute registration tutorial from CAGD shows every screen. Watch it first, or follow the written steps below.

Watch on YouTube · 2:02

Register your account

STEP 01 / 7

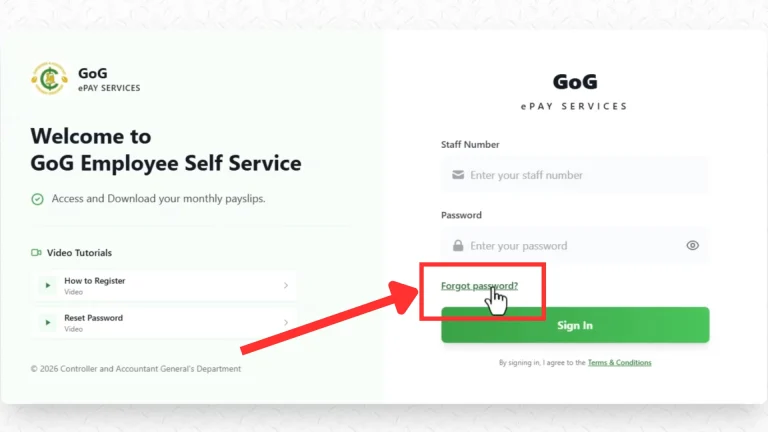
Start with “Forgot password?”.

Open the employee portal. The CAGD registration video starts from the “Forgot password?” link on the sign-in screen.

Sign-in screen highlighting the Forgot password link below empty Staff Number and Password fields
Select the highlighted “Forgot password?” link. Tap the image to enlarge.
  1. Check that you are at the portal address shown on this page.
  2. Select “Forgot password?” below the Password field.

Good to know The video uses this route to set up access. Follow the current portal if its instructions have changed.

PORTAL ADDRESSgogepayservices.com
Open the portal Watch this step · 0:20

STEP 02 / 7

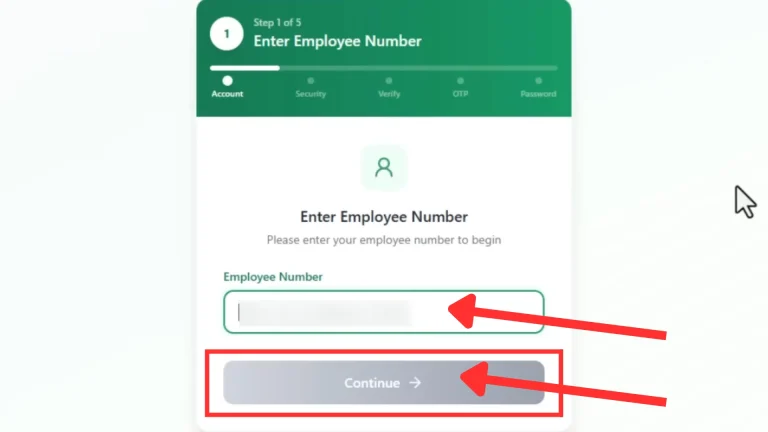
Enter your employee number.

Use your employee number to start the account setup process.

Employee Number entry screen with the number obscured and arrows pointing to the field and Continue button
Enter Employee Number, then select “Continue”. Tap the image to enlarge.
  1. Enter your Employee Number in the field shown.
  2. Select “Continue” to move to identity verification.

Good to know If your employee record cannot be found, ask your employer’s payroll administrator or HR department for help.

Watch this step · 0:24

STEP 03 / 7

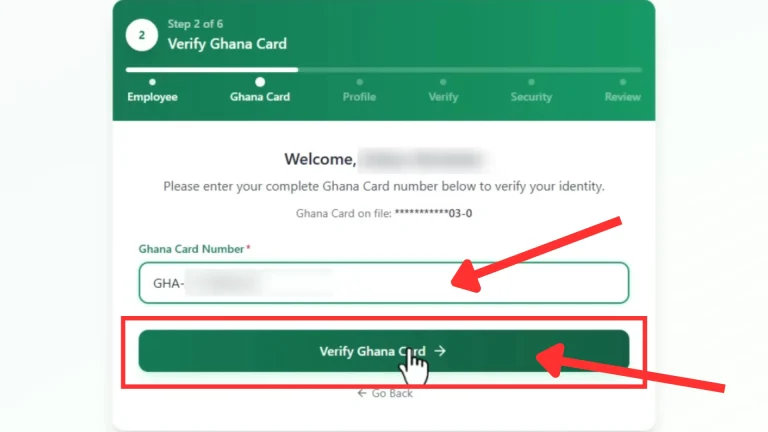
Verify your Ghana Card.

The portal checks your identity against the Ghana Card information on your employee record.

Verify Ghana Card screen with personal details obscured and arrows highlighting Ghana Card Number and Verify Ghana Card
Enter the complete number and select “Verify Ghana Card”. Tap the image to enlarge.
  1. Enter your complete Ghana Card number.
  2. Select “Verify Ghana Card” to continue.

Good to know Check the full number carefully. If the record does not match, contact HR rather than entering someone else’s details.

Watch this step · 0:31

STEP 04 / 7

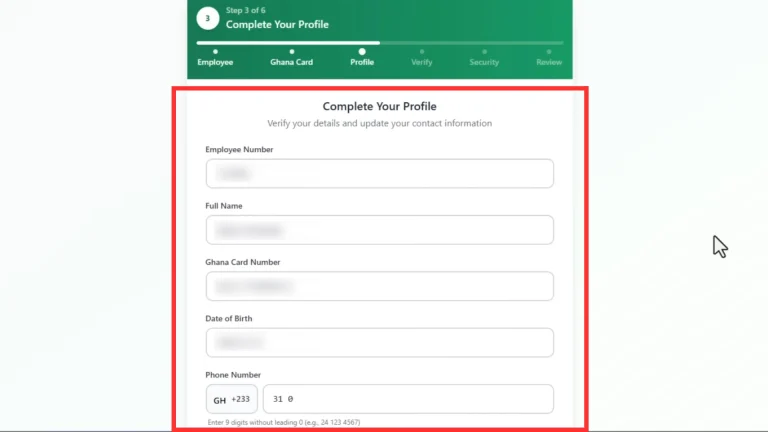
Confirm your profile.

Review your employee details and update the contact information used for verification.

Complete Your Profile form showing employee and contact fields with identity details obscured
Check the profile fields and supply a phone number you can access. Tap the image to enlarge.
  1. Check your employee number, name, Ghana Card number and date of birth.
  2. Add or update your phone number; this is required. Email is optional.
  3. Select “Next” after checking your details.

Good to know The video directs you to HR for corrections to greyed-out fields. Those fields cannot be changed here.

Watch this step · 0:40

STEP 05 / 7

Verify your phone number.

The portal asks you to confirm your phone number before sending a one-time password (OTP).

  1. Check the phone number in the confirmation prompt.
  2. Select “Yes” to request the OTP.
  3. Enter the code you receive and select “Verify OTP”.

Good to know Keep the OTP private. If it does not arrive, follow the portal’s available retry instructions or ask your payroll administrator for help.

Watch this step · 1:00

STEP 06 / 7

Choose your password and security question.

Set your new password and a security answer for future password recovery.

  1. Enter your new password, then enter it again to confirm.
  2. Choose a security question and supply your answer.
  3. Select “Next” to reach the review page.

Good to know Follow the password requirements shown by the portal. Keep your password and security answer private.

Watch this step · 1:16

STEP 07 / 7

Review, register, then sign in.

Check the summary before completing your account registration.

  1. Review your information and read the confirmation beside the checkbox.
  2. If the details are correct and you agree, select the checkbox and “Register Account”.
  3. After the success message, select “Go to Login”.
  4. Enter your Staff Number and new Password, then select “Sign In”.

Good to know If the confirmation shows incorrect information, go back and correct it before registering.

Watch this step · 1:32